
I belong to a GREAT community of artists! Selfless, generous and mission-driven. That truly is the story behind the journey of The Best Little Bead Box. The box is a little past the halfway point of its journey and continues to grow as beaders add MORE treasures to the box to raise awareness and funds for Beads of Courage. Now we're gearing up for Journey Box #2 and already other beaders are raising their hands to join this worthy cause. Read up on the box's journey or apply to participate in Round 2. Click here for their blog for more details!
God bless!
Monday, November 15, 2010
Friday, October 01, 2010
The Best Little Bead Box That Could!
 Please click on the image above to visit their blog and read about this wonderful fund-raising project for Beads of Courage. The Best Little Bead Box is the brainchild of fellow beaders, Jennifer Van Benschoten of VanBeads and Carol Dean Sharpe of Sand Fibers. Follow the travels of The Best Little Bead Box through it's blog or facebook page and get a chance to secure this treasure box for your own and raise money for the children of Beads of Courage!
Sunday, August 15, 2010
Orange To Eat and Wear

Happy Sunday!
Spur-of-the-moment salad I threw together made with grated carrots and broccolini lightly sauteed in olive oil and garlic, topped with orange wedges, served on a bed of spring greens, and dressed with a splash of my homemade herb vinegar (fresh oregano, thyme and red wine vinegar). Yum-yum!
This reminded me of some of the jewelry I've made that had orange in them. It's a color I seldom use but does give some drama when I do get to use it. So here's the orange stuff to wear!


What have you done with orange, lately?
Thursday, July 08, 2010
Shades of Ocean Waters - my BAO Item Of The Week

I can't help myself. This color palette is one of my favorites and I keep creating pieces using these beads. Almost like an addiction. But you've got to agree these are perfect summer colors.
This bracelet is also my play on freeform right angle weave. I love anything freeform and mostly do pieces in peyote stitch but why not right angle weave, I thought, and here is the result. The bracelet came out really soft with the right drape over the wrist. Gorgeous!
I hope you like it. I will be posting this in my etsy store today with more photos so have a peek!


Sunday, June 20, 2010
My Life In Herbs...and Beads!

The days have been gorgeous and definitely relaxing. I'm enjoying this summer more than the past summers. My herb "garden" (in-a-pot!) has been flourishing that I've been using fresh herbs in my cooking almost everyday. My son was a skeptic at first ("o-oh, Mom's experimenting again.") but he's now convinced that Mom knows best as evidenced by the delicious meals he's eaten!
Let me introduce you to the herb "garden." I've got cilantro (my favorite!), french tarragon, lemon thyme, golden sage, rosemary, lemon balm and greek oregano. I've tied a bunch and started to test drying them. So far looks good.
 I decided to do some herb vinegars as well. I have rosemary, sage and garlic in apple cider vinegar. I also did a bottle of the thyme and a sprig of oregano in red wine vinegar. I love red wine vinegar. I prefer red in my vinegars and white in my alcohol!
So from the pot to the bottle, here are my babies! Hmmm, wondering what recipes I will use these herb vinegars in.
 Later this week, I'll do some in olive oil and sunflower or grape seed oil. I haven't decided what concoctions I'll do.
Oh, yes, I do continue to bead. I'm not working on specific projects, more like mental doodling. I'm mostly doing practice work and trying to conceptualize new techniques. Where it takes me would be another adventure!

Sunday, May 23, 2010
Cheerful Bloom

I just wanted to share this shot with you all. I don't know the name of this plant. If you do, let me know. They were just so cute and adorable.
Friday, May 21, 2010
author's alternations (AA)
 One of the dreaded phrases Account Managers, Copy Writers or Art Directors in the advertising world have to hear -- AAs -- especially if they happen more than once (Yep, I was an Ad Exec in a past life). What it basically means is, you are in the final stages of say getting approval on a print ad proof from your client, and Mr. BrainFreeze thinks the headline is "Just not right." and this after he's approved and seen the print ad from the early stages of conceptualization to now when you are just a day away from the magazine print deadline. "Let's go with the other headline instead. That shouldn't be a problem, right." concludes Mr. BrainFreeze -- and everyone in the room just feels like tearing their hair out.
Segue now to my life as a jewelry artist and I'm Mr. BrainFreeze doing the author alterations I so keenly abhorred my clients doing. I have this bead pattern which I just kept changing and changing, over and over again. I have 3 "final" versions of the pattern. And this is only because I remembered to save versions of the "final" pattern.
I kept "tweaking" and "tweaking" (where did this word originate from?) till I forced myself to stop - ENOUGH! I even did one more "tweak" even AFTER I started working on the bracelet.
I have named this pattern KAOS!
Here's the finished bracelet which I will be listing in my Etsy store as a Made To Order Item:
 And here are the 3 variations:
#1 - I didn't like the blue here.
 #3 - so I changed the lower part as you can see!
BAO Item of the Week May 21 - 27
My cuff links are my featured Bead Art Originals (BAO) Item of the Week for May 21-27. Nine other BAO artists are participating this week with their own special items and offers. Click on the image below or go to BeadArtOriginals.Blogspot.com for details on each of these items and the specials available on them below.

Wednesday, May 19, 2010
Forgettable Cuff Links and E.T.
 Fewer men wear cuff links these days. I think it's sad because somehow it signifies the decline of the art of fine dressing. But I'm hopeful and so I work on more cuff links. I've done about a dozen of these in the past and they have sold in craft shows and all have been bought by men. I noticed most of these guys were not expecting to find anything on my table and, therefore, surprised -- "Oh, are these cuff links?" They were even more surprised by how inexpensive they were.
I've made more of these cuff links just recently and posted them to my Etsy shop. So I can only hope there are men and women online who would look at these often forgotten but ever so fine piece of accessory.

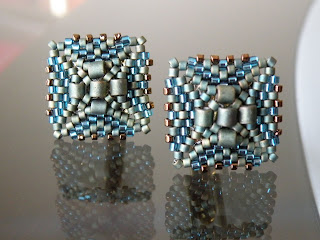 P.S. While in production, I happen to take this shot of a batch of cuff links while waiting for the glue to dry. Looks very E.T!
Wednesday, May 12, 2010
Heavenly Hummus
 I know this shot is totally unappetizing but just to let you
know I didn't get a chance for a food shot because my guests
just scooped the hummus straight from this container.
So this is "bottom of the barrel" shot so to speak :)
INGREDIENTS
2 cans chickpeas (I prefer to drain and rinse the chickpeas)
1/2 c. extra virgin olive oil
juice from 1/2 lemon
1-3 large cloves garlic, peeled (number of cloves depends on how much you love garlic. I do 3 but that might be too strong for most people)
2 tsp. sesame seeds
3-4 shakes of ground cumin
2-3 shakes of paprika (I like spanish paprika or pimenton)
1/4 c. water
salt and pepper to taste
cilantro or parsley for garnish
DIRECTIONS
Combine all ingredients in a food processor and blend on low speed or pulse depending on your machine's capability. You may need to stop at intervals to push down the ingredients. If the mix is too dry, dribble in some olive oil or water (whichever you prefer. I love olive oil so that what I would use). I suggest adding a tablespoon at a time of the liquid so you don't make a mistake and end up with too watery mix. Be patient. I like to blend it to the same consistency as peanut butter.
When done, scrape the mixture on to a serving bowl. You can garnish it by dribbling just a bit of olive oil on top, a light sprinkling of paprika and the parsley.
Serve with corn chips or pita bread. I like to take pita pockets, toast them in a toaster and slice them like pizza. Then your guests can spread the hummus in the pita pockets slices and munch away!
You may also notice that I skipped the Tahini in this recipe. I didn't find any in my local grocer and didn't have the patience to run from store to store. You can make your own tahini by blending lightly toasted sesame seeds with olive oil in a food processor. You'll need to get the right proportion between seeds and oil in order to create the right pasty consistency. Again, adding the liquid little by little as you blend it is better than ending up with a watery tahini mixture.
Have fun!
Tuesday, May 11, 2010
So I'm Suppose To Take Care of the Bonsai?
 You need to realize I DO NOT HAVE A GREEN THUMB. My DH, Mike, has always been the gardener growing tomatoes and peppers in our back yard. Me, I love rock gardens! But for some reason, I have been appointed caregiver for these bonsai. The last plant I had was a pot of English ivy which in fact is a WEED but it still died on me!
 I flashback to ages ago when I had a boyfriend who did bonsai for a hobby. He blindly entrusted four precious trees to me which promptly died in my “care.” Are these bonsais to suffer the same fate?

Anyway, I'm clicking around the site and Mike cries "Stop!"
I freeze, "What?!"
"Look at that bonsai. Bonsais are cool," my husband intones.
"Uh, yeah. But I don't think Marcy will have the time and patience to care for them, dear. She travels a lot remember." I patiently pointed out.
"No, for us. It would look good on the coffee table or by the console." Oh, so innocent.
Anyway, we sent orchids to Marcy and I thought that was the end of it.
The following days, I was peppered with bonsai questions – “What type of bonsai is best?” “A bonsai would look good over here.” “Do they have to be trimmed a lot, you think?” It was HINT, HINT! for three days till I finally caved and bought NOT ONE BUT TWO bonsais (“L” sign on my forehead, I know!). Mike was ecstatic. I had ordered a juniper tree and a gardenia bonsai.
It was a huge production when they finally arrived. Mike was like a kid on Christmas morning. The trees were buried in a boxful of styrofoam peanuts and wrapped securely in foam and packing tape. After 20 minutes, we managed to extricate them every so carefully so as not to hurt the branches or leaves.
So I set them up, place the pots on the humidity trays, line the trays with the white pebbles, dust off the excess soil around the pots, etc. They are gorgeous I must say. The juniper was just staged nicely and the gardenia had young flower buds that would soon bloom. Both plants were taller than the web site description. Mike didn’t mind, but that now posed a problem on where to place them.
Plus, I didn’t realize that the juniper was an outdoor bonsai. Ergo, no other place for it but on our balcony – “But the cold wind might tip it over.” This from Mike. OH-Kay. At this point, I’m rolling my eyes at Grandma Moses.
The next day, I overhear Mike on the phone: “Yeah, Regina bought some bonsai trees. Really nice!....Yeah, I guess she’ll be trimming and fussing over them……No, she hasn’t bought any fertilizer, maybe later…….She hasn’t decided where she really wants them, you know how that goes…..She hasn’t watered them yet, I guess she has a schedule for that….One is outdoor and one with flowers is indoor…No, she hasn’t done that…..Oh, I’m sure she knows that….. I really don’t know anything…….Honey, what kind of bonsai did you buy?”
I beg you to pray for these bonsai.
Monday, May 10, 2010
3 Stones in a Frame Pendant
 To celebrate a friend's milestone birthday (Happy 5oth!), I thought I'd make her a pendant. I know I wanted to use purple swarovski crystals. I was sure I wanted to create a piece using silver and 24K gold delicas, so I started working on the stones while I tossed around ideas on how I wanted to complete the piece.
As most of my bead projects progress, I start bit by bit and then proceed with components piece by piece till it feels "right." The stones stayed on my work table for some time before I finally decided to frame 3 stones in a rectangular piece. I managed to shoot the work in progress as I made the "frame" but completely missed out on shooting the completed piece! I was just too excited to wrap the piece in a box to give to my friend. Here are shots as I made the piece.
I started with the desired number of beads in a circle then delineated the corners for the rectangle with herringbone corners.
 I worked around the rectangle for as many rows as shown. I didn't want to frame to be thicker than needed as I wanted a rigid structure for the pendant.
 I found it easier to work the piece into 3D by working on one side rather than working in the round. So once I hit the halfway mark on one side, I started with the gold beads for the design and continued on till I had completed one side.
 I zipped the straight sides closed and kept the slanted ends open to be connected later as I completed each side. Now work on another side and zipper it shut.
 After the longer side has been zipped, your can weave the corners together.
 Complete all sides of the pendant. Finally mount the stones and weave the bail. I just did a simple bail, 4 beads wide, about 16 beads long. For chain, I used a gold filled snake chain with a lobster clasp to complete the necklace.
Sunday, May 09, 2010

Saturday, May 08, 2010
De-Tox!

Today, I'm trying to be good and put my eating back on track. I got out my juicer and citromatic. I juiced the oranges and the apples, strawberries and grapes went into the juicer. Heavenly breakfast!
For lunch I had homemade hummus (I'll share the recipe later this week), avocado, broccoli sprouts, lettuce, sesame seeds and tomatoes in a whole wheat wrap. I didn't think of taking a picture of that one, sorry :)
Tomorrow is Mother's Day and Mike wants to take me to my favorite Italian restaurant so the eating will take another step back but it will be worth it!
Happy Mother's Day to all Moms out there!
Sunday, April 04, 2010
Foodie-licious
 In an effort to satiate my teenager's ever growing palate, I try to come up with new recipes. I have never been the type to looks at cookbooks and follow recipes to the tee. More often, I would embellish or make up an ingredient or method on my own. Hmmm...almost sounds like I'm talking about my beadwork.
At any rate, back to recipe talk. I thought I'd share this one with you. It's a completely original recipe. I often look at what I have in the fridge and pantry and put them together. For lack of a better name this dish is hereby dubbed "Everything Italian Italian Sausage." It started because I just want to do a dish using Italian sausage and have other Italian ingredients and, of course, cooked in about half an hour.
Everything Italian Italian Sausage
5-6 Italian Sausages (sweet, mild or hot depending on your taste. I used sweet for this recipe)
1 medium yellow onion, chopped
2 cans sliced mushrooms
3-4 tablespoons white beans (canned)
1 14 oz. can Contadina Stewed tomatoes
2 tablespoons Italian Dressing
Oregano
Parsley
Celery salt and pepper to taste
1 can black olives, quartered
In a large deep skillet, heat 2 tablespoons of olive oil. Brown the sausages whole just to get them started. The objective is to just brown and firm up the sausages so you can easily slice them into bite size pieces for the dish. After slicing the sausages, return them to the skillet. Add the onions. Brown some more until the onions are slightly caramelized and the sausages are brown on all sides.
Add the rest of the ingredients into the skillet. Stir to blend all ingredients. Simmer for 15-20 minutes.
Serving suggestions:
· Serve over pasta
· Serve with garlic bread on the side
· You can also add some cabbage to the dish
Bon Apetit!
Saturday, April 03, 2010
Spring has Sprung....
 Yesterday was a glorious day in DC. Spring has finally taken a hold with the sun shining, clear blue skies and cherry blossoms in full bloom at The National Mall. I'd like to share these photos of our walk to the Tidal Basin. It was a madhouse, with tourists swarming the whole scene and mad traffic, ambulance sirens screaming every half minute - but well worth the walk. Wherever you are in the world, enjoy!
 Good old Washington Monument!
 And my favorite pooch in the world - Lucy!!!
Sunday, February 21, 2010
Interpretations
 I started a new project the other weekend, playing around with chinese crystal beads. I posted my first attempts on this the last time (click here to read that.). It's interesting to work on the same materials but to come up with as many combinations on technique and color.
My work has ranged from the stringent peyote bezeling technique which requires a prescribed bead count, size and shape to be successful in mounting a crystal on a beaded bezel. Then there's a brick stitch technique, pretty casual but rythmic in its execution. Then there's the devil-may-care freeform peyote technique which pretty much you can do with your eyes closed when picking up a bead and weaving them all together - well, I really didn't close my eyes otherwise I'd risk stabbing my fingers with my needles (I totally hate when that happens!).
Here's some eye candy!


Sunday, February 14, 2010
Blue Skies Shining on Me....


I started a new project which is a good sign for me. Just playing around with chinese crystals and itty bitty beads. I just realized the blue and smoky crystals reflect the past winterstorms and today's blue skies. How rich is that?!

Subscribe to:
Comments (Atom)


